However, when a friend of mine asked me to make a cardigan for her unborn baby girl, I enthusiastically agreed. She and her husband were expecting their first child and they'd moved to Australia a little over a year ago so they don't have a lot of family around to help them. I know it's a small thing but I wanted this baby to have something handknitted. Afterall, a handknit baby is a loved baby, right?
That was a bit of a long introduction but here's the finished product...

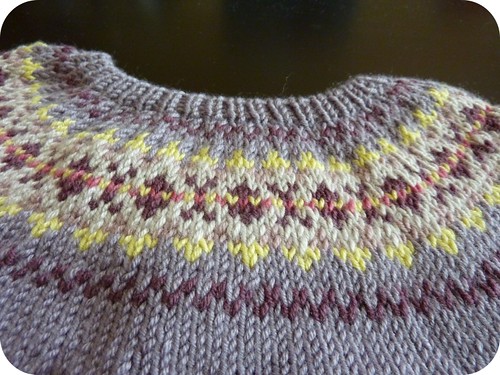
The pattern I decided on was the beaded fair isle cardigan from Debbie Bliss' The Baby Knits Book. It took me months to pick a pattern because I wanted it to be something special but also interesting to knit. By the time I picked the pattern the baby was due in less than 4 weeks so I decided to make the 6-9 month size since it won't be cold enough to wear until next winter anyway.
I had 5 balls of Baby Cashmerino in lilac in my stash (purchased in Stockholm, of all places) for the main colour, and used contrast colours from single balls of 100% merino I bought from Wilfert's in Copenhagen and odd balls of Baby Cashmerino.
I had 5 balls of Baby Cashmerino in lilac in my stash (purchased in Stockholm, of all places) for the main colour, and used contrast colours from single balls of 100% merino I bought from Wilfert's in Copenhagen and odd balls of Baby Cashmerino.

I have to say the pattern was very difficult to understand. There was no schematic and no summary of how the cardigan is constructed. It was also impossible to work anything out from the 2 highly styled but very uninformative photos in the book.
Basically in the original design, the body is knitted up to the armpits, then the fronts and back are worked separately and a series of bind offs involving short rows creates the semi-circular yoke shape, then the remaining stitches are joined at the shoulders and stitches picked up along the cast off yoke shape, then the patterned yoke is knitted, incorporating decrease rows to shape the yoke and then finally using smaller and smaller needles to shape the neck. The sleeves are knitted separately and joined to the body in a drop sleeve style.
Is this over complicated or what???
I did some simple calculations with the help of EZ's Knitting Without Tears and ended up knitting the sleeves in the round, joining them with the body at the armpits, decreasing evenly to the number of stitches needed for the yoke, then followed the rest of the pattern.
Too easy.
I also used a rib tubular cast on and bind off to give a smooth edge. That's about all the changes I made and it meant virtually no seaming, except for the few stitches under the armpits.
More pics on ravelry.
Oh and Emily arrived early last Sunday. I hope she likes her new cardigan.
Too easy.
I also used a rib tubular cast on and bind off to give a smooth edge. That's about all the changes I made and it meant virtually no seaming, except for the few stitches under the armpits.
More pics on ravelry.
Oh and Emily arrived early last Sunday. I hope she likes her new cardigan.